Spooler Smart
The guide is free to read. You pay for access to the production files (STL, DXF, STEP, PDF, ZIP) and the assembly videos.
- €99Sign in to buy
Spooler Smart
Spooler Smart
Build guide
Spooler Smart
A measuring unwinder with display, AS5600 sensor and control board.
- Head with display and AS5600 sensor, full guide and bill of materials
- Wiring of the electronics (buy the electronics ready-made in the e-shop)
- Files
- Bill of materials · 27
- Updated 31 Oct 2026
🔒 Production files and videos
The guide is free to read. You pay for access to the production files (STL, DXF, STEP, PDF, ZIP) and the assembly videos.
- €99Sign in to buy
Spooler Smart
Spooler Smart
Downloads
Assembly guide (PDF)
printable guide, all chapters
All files (ZIP)
guide, 3D models, files and videos
3D models Spooler Smart (STL)
20 parts: body, head with electronics, rollers (the spool parts are in the spool guide)
Bill of materials
| Qty | Item | Category | Note |
|---|---|---|---|
| 4 | Screw M4x10 | Screws | Latch 2, catch 2 |
| 8 | Screw M5x16, countersunk head | Screws | Packout holders |
| 2 | Screw M5x20 | Screws | Bases |
| 3 | Screw M5x50 | Screws | Joins the arms |
| 8 | Screw M8x20 | Screws | 4 axes, 2 screws per axis |
| 16 | Washers 8x12 and 8x16 | Screws | 8 + 8, each end of 4 axes |
| 4 | Insert M4 | Inserts | Latch and catch |
| 9+ | Insert M5 | Inserts | |
| 8 | Bearing 608-2RS | Mechanics | 4 axes, 2 bearings per axis |
| 4 | Axis M8 aluminium, 71 mm | Mechanics | Roller, lathe |
| 1 | Draw latch K2469 + catch K2468 | Mechanics | Kipp |
| 6 | Screw M3x10, countersunk head | Screws | Battery lid |
| 2 | Screw M3x10, cheese head | Screws | PUSHER-CLAMP |
| 1 | Screw M4x40 | Screws | Encoder wheel |
| 1 | Screw M6x20 | Screws | Spring housing |
| 8 | Plastic screw 2.2x5 | Screws | Display and AS5600 |
| 2 | Nut M4, self-locking | Screws | Encoder wheel |
| 8 | Insert M3 | Inserts | Battery 4, arms 2, pusher 2 |
| 1 | Insert M6 | Inserts | Spring housing |
| 4 | Bearing 624-2Z | Mechanics | Pusher 2, encoder 2 |
| 1 | Spring (11.5 x 5.2 mm) | Mechanics | Pusher |
| 1 | Axis 4x40 stainless | Mechanics | Pusher roller |
| 1 | Spooler B control board (ESP32-C3) | Electronics | 75 × 28 mm, 76 components |
| 1 | AS5600 board with magnet | Electronics | Encoder |
| 1 | OLED display 0.96", 4 pins | Electronics | |
| 1 | Panel button | Electronics | |
| 1 | 18650 / 26650 battery holder + cell | Electronics |
GuideSpooler Smart
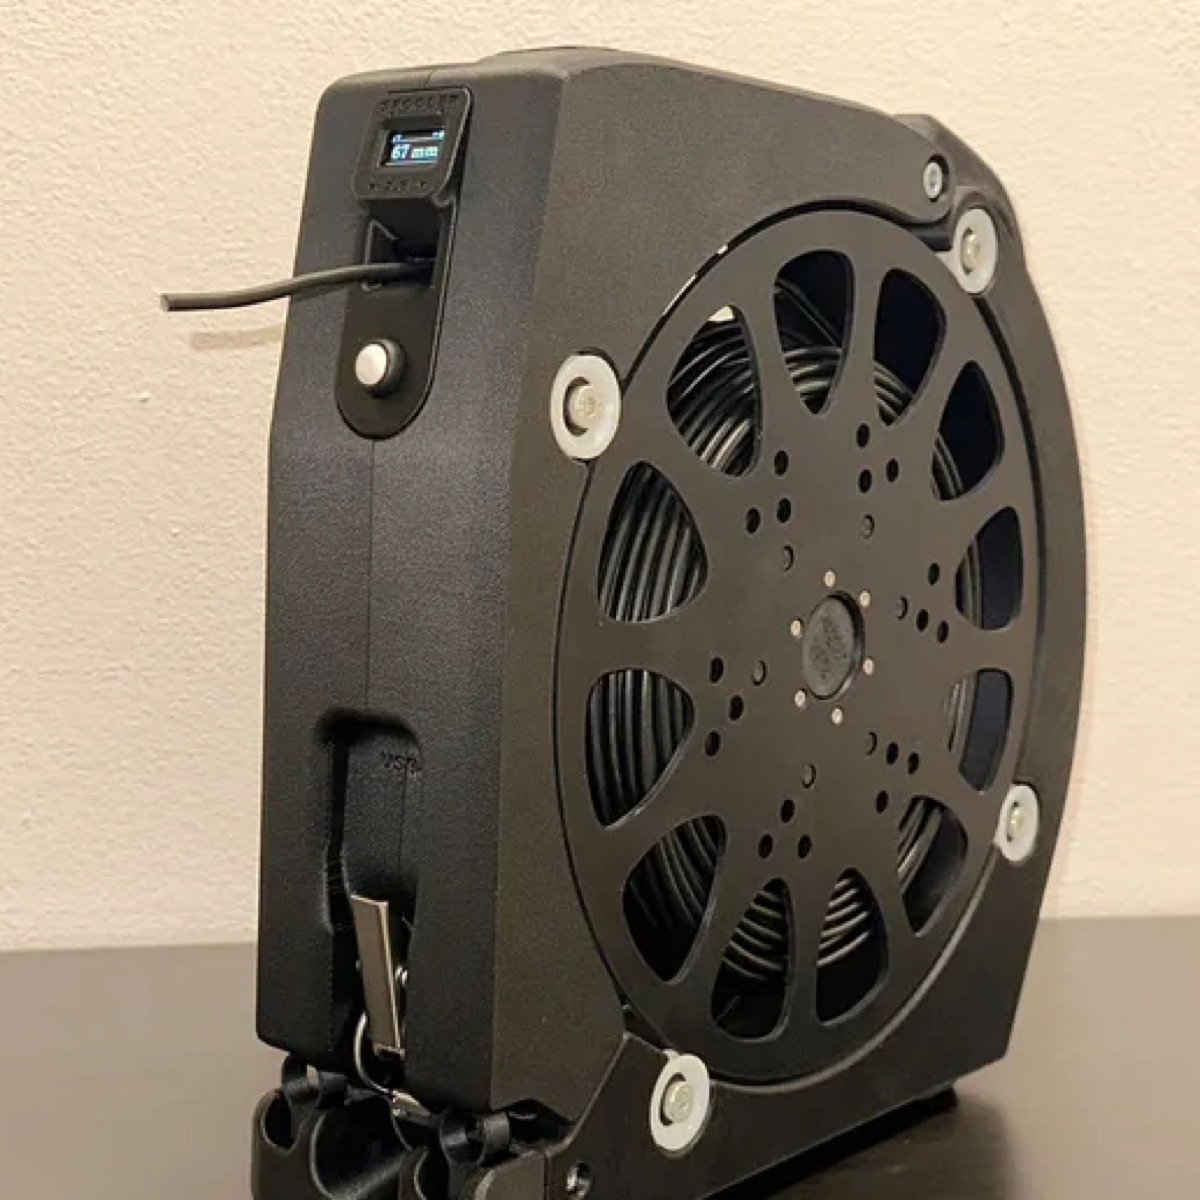
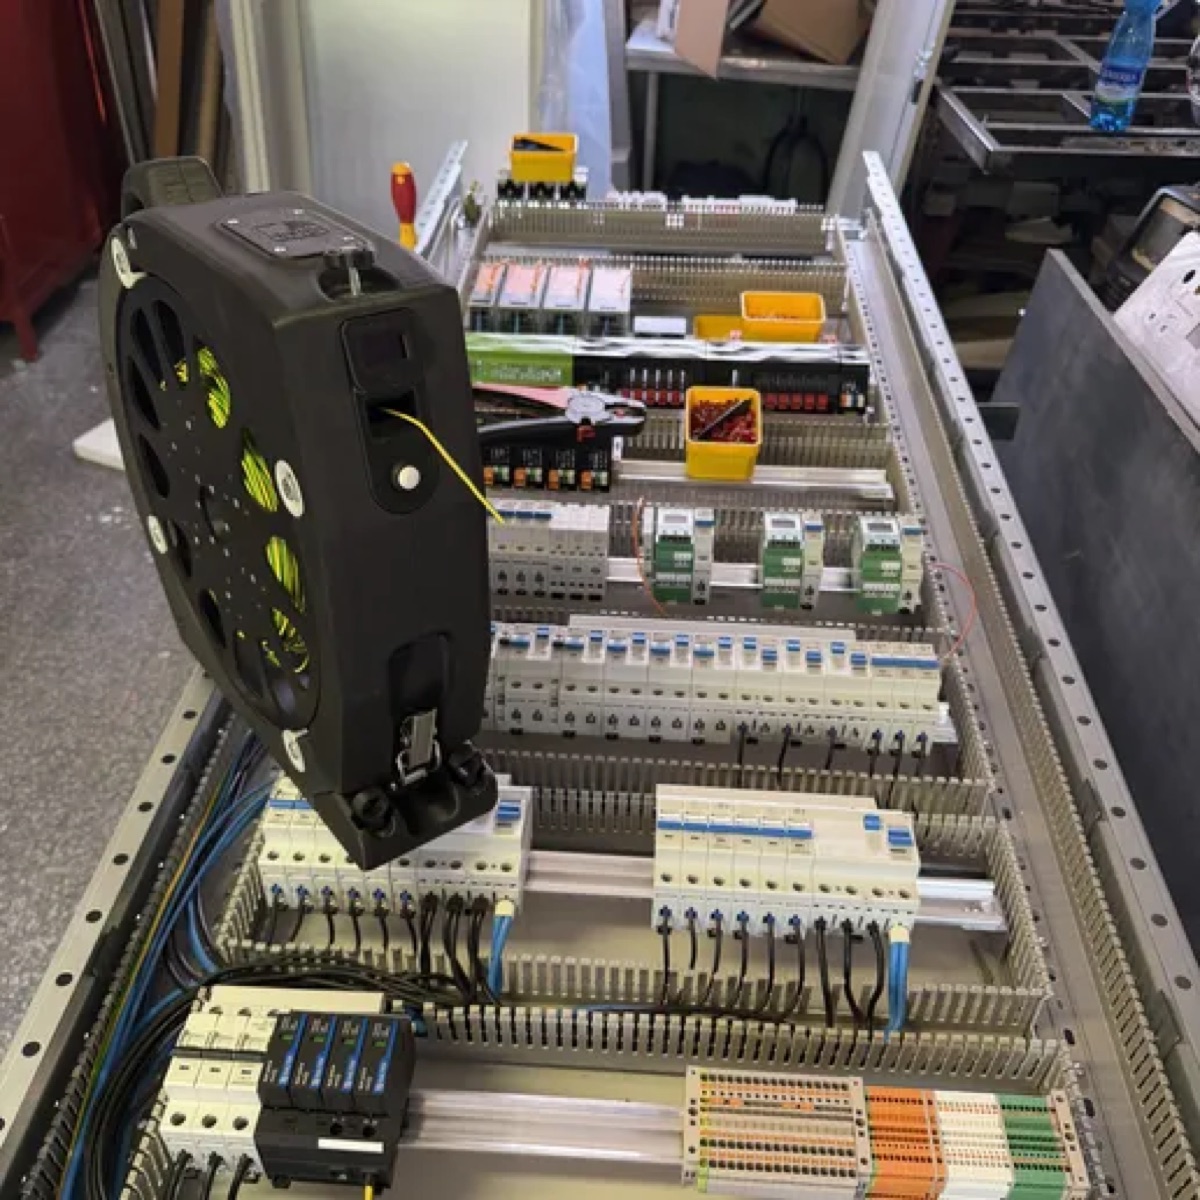
Spooler measures and dispenses cable, keeps track of your stock and records the history of the measurements. You control it from an app for Android or Apple. You print most of the parts on a 3D printer; the rest are turned and laser-cut parts, threaded inserts and bought components such as screws and washers. You can print in ASA-CF or in material of the Spectrum brand. You can buy the electronics and the turned and laser-cut parts in the e-shop.
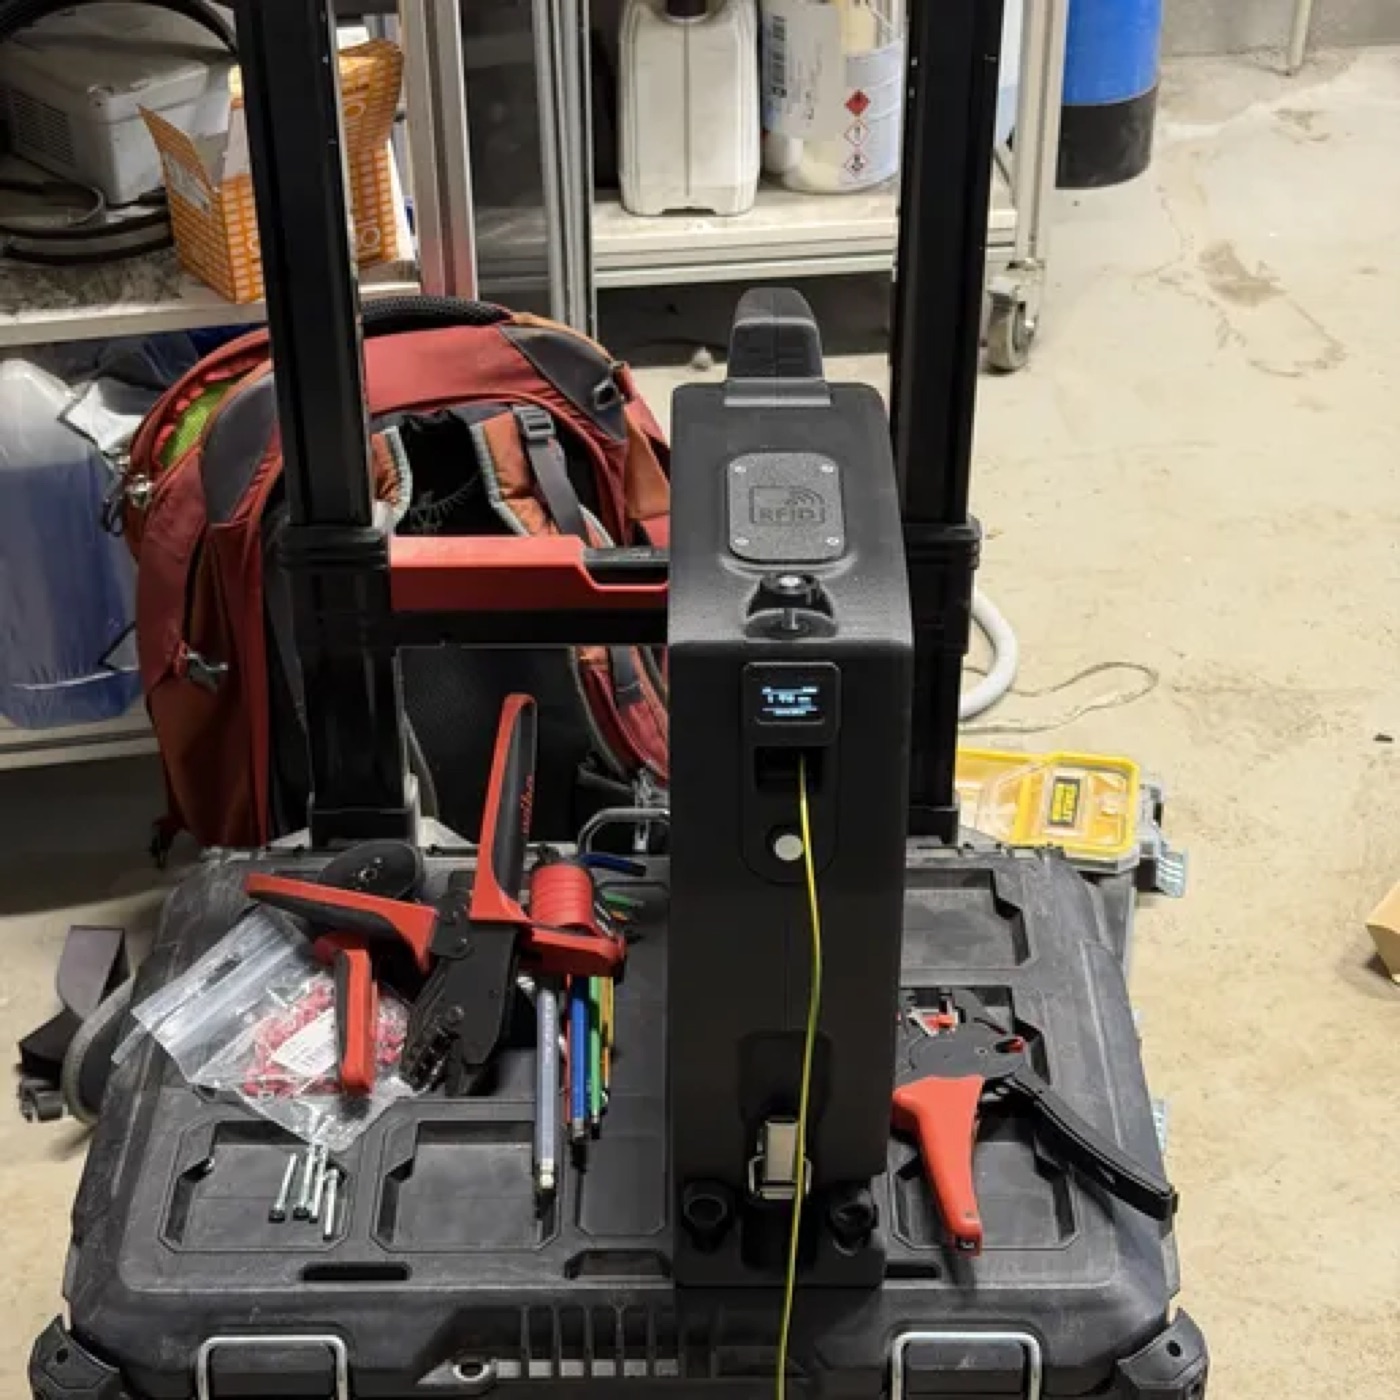
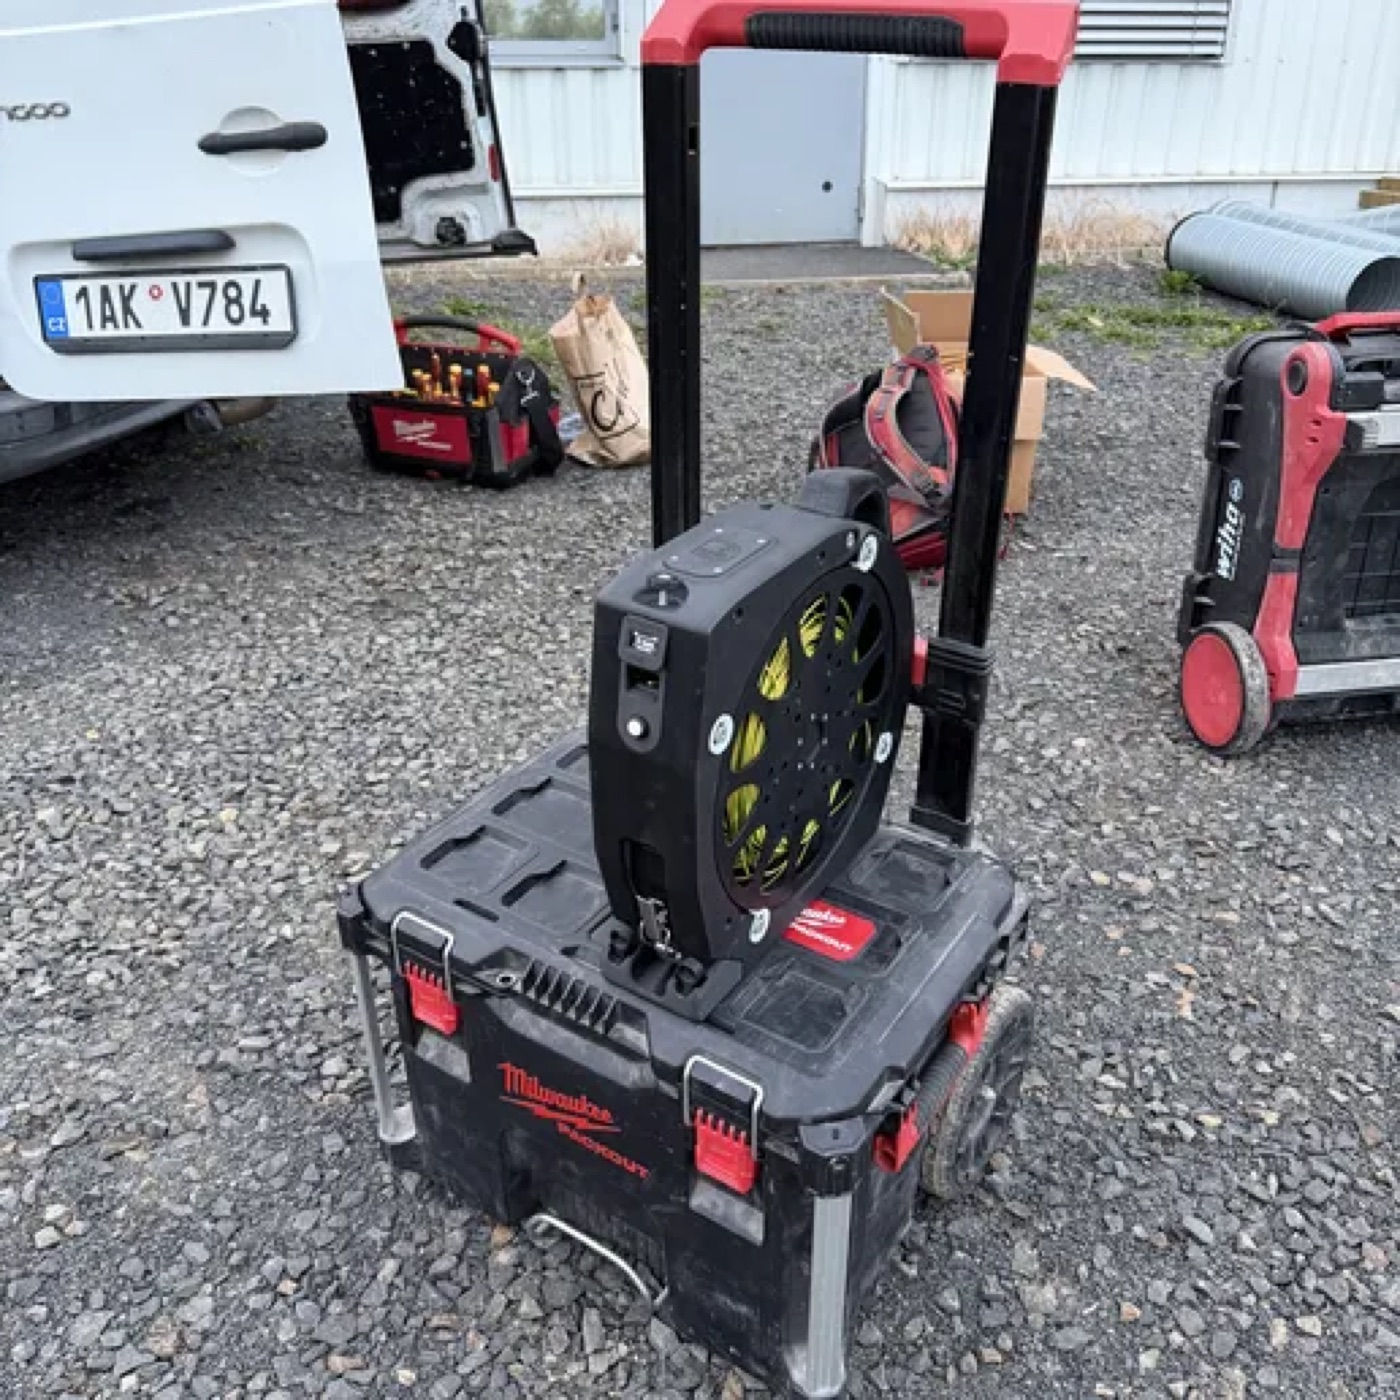
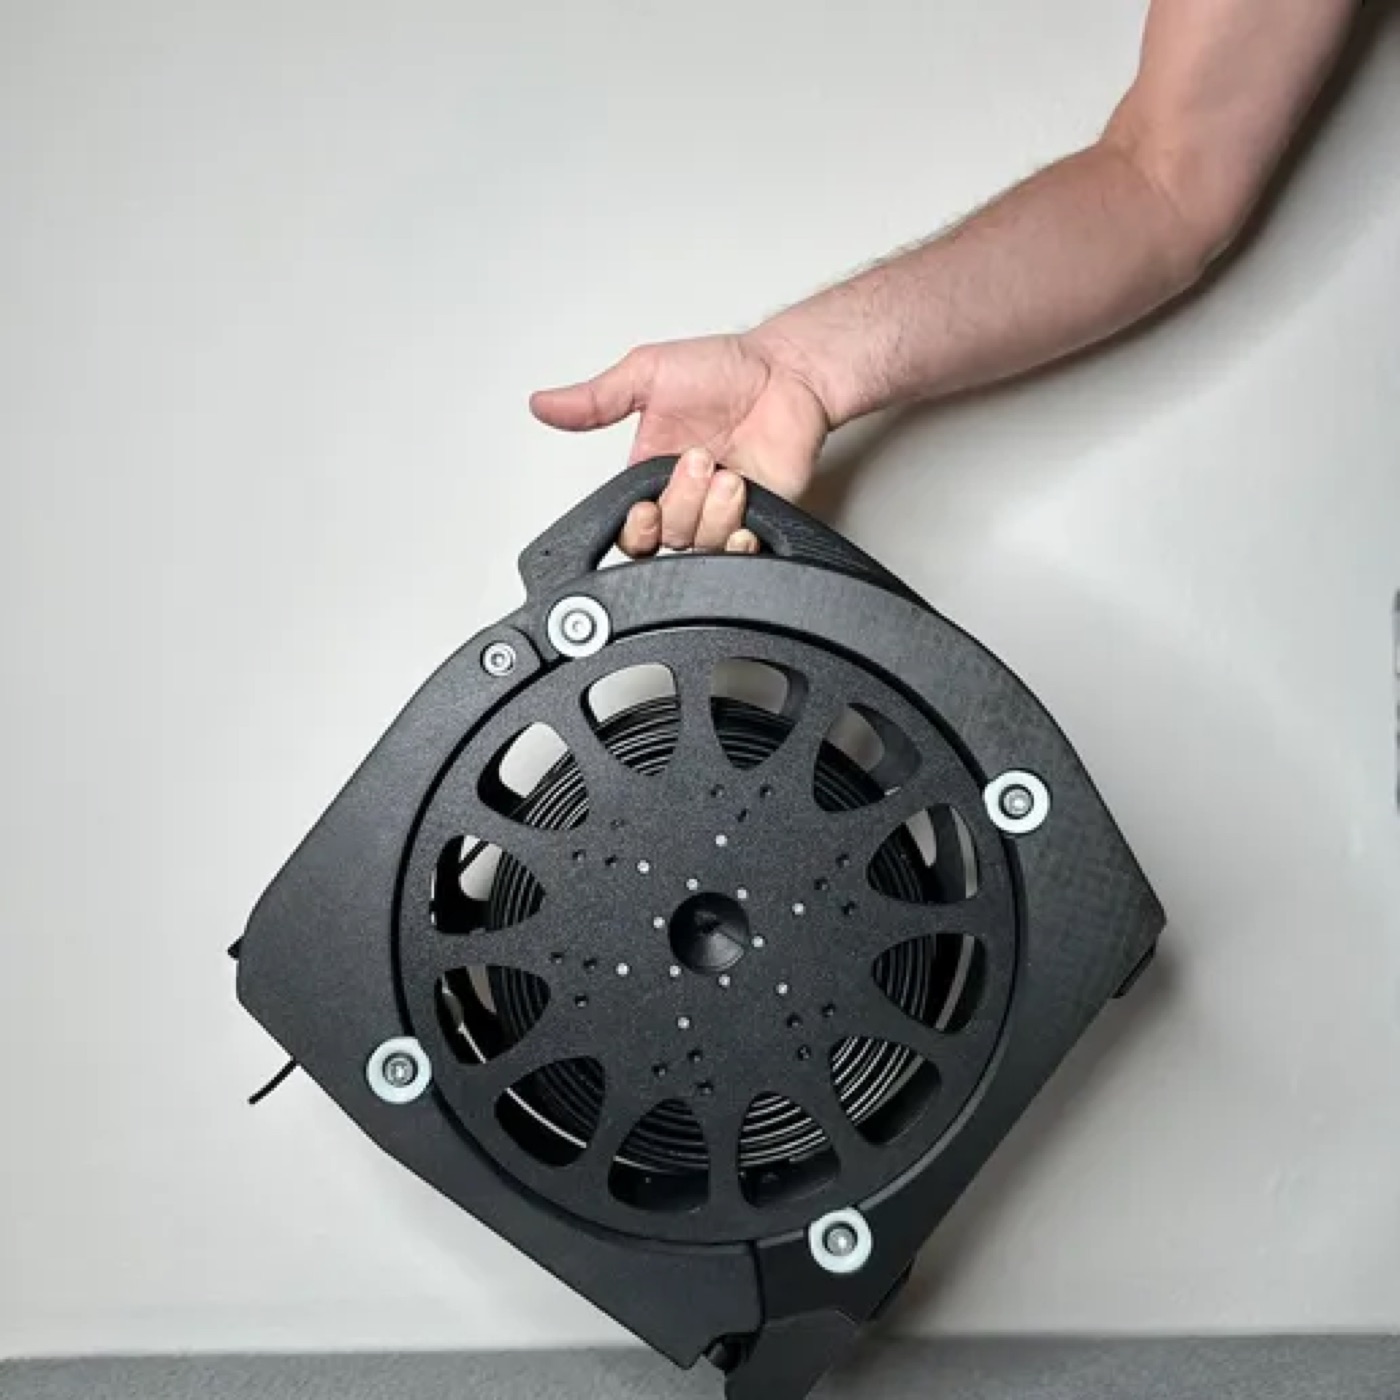
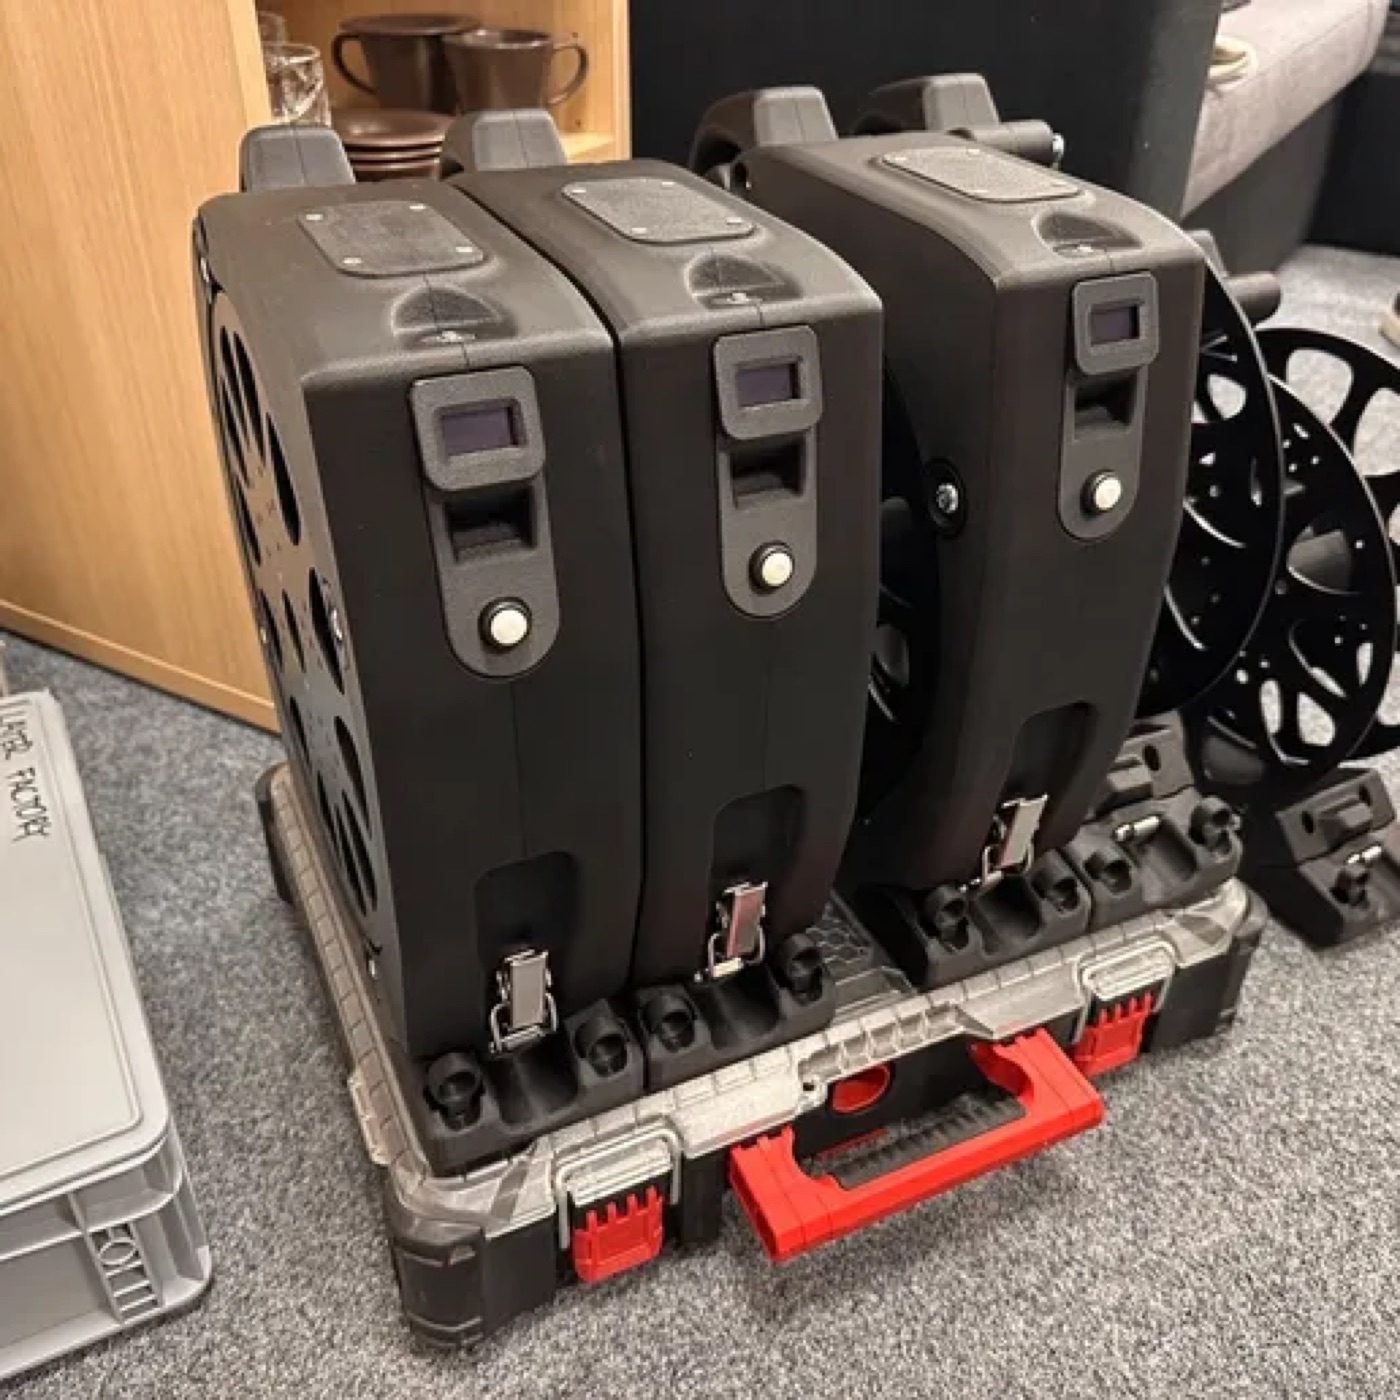
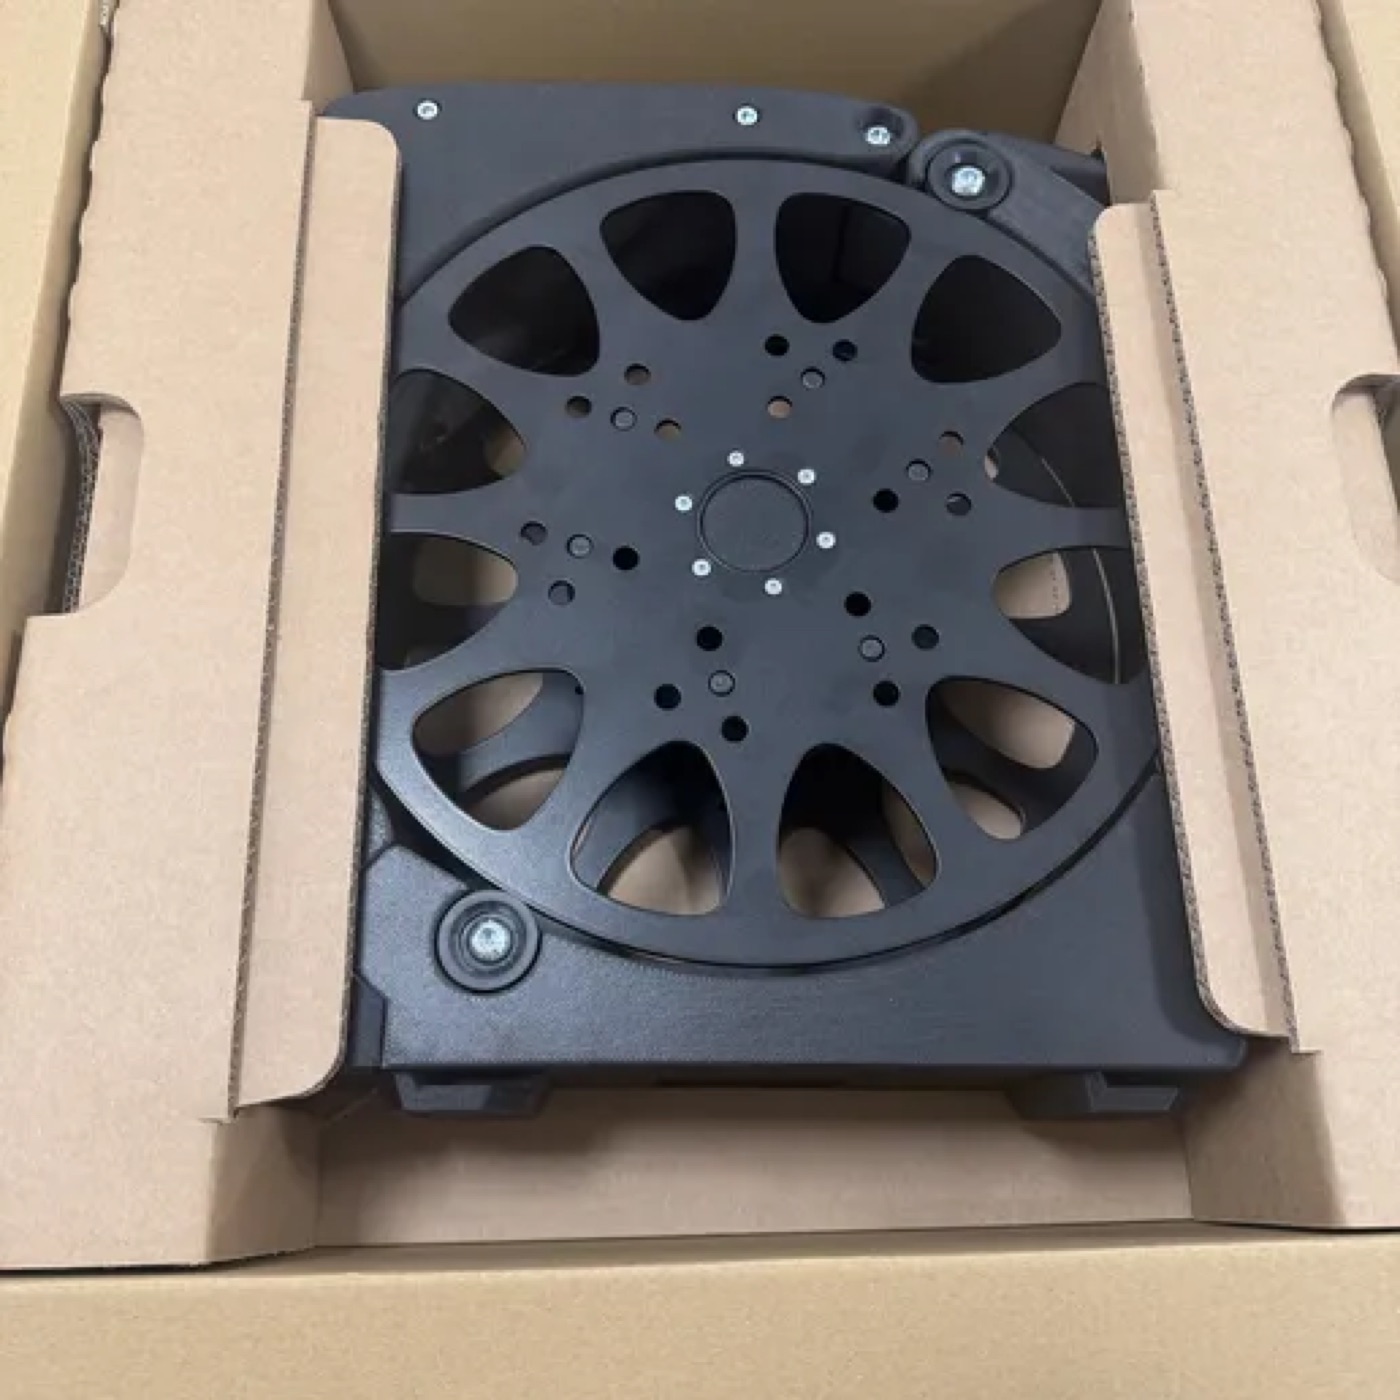
The spool has a guide of its own and is built separately.
You can buy the electronics (the assembled control board, the display and the sensor) ready-made in our e-shop, as well as the turned and laser-cut parts.
What you will need
All STL models (ZIP) (3.6 MB) ·
Body
| Part | Made by | Note |
|---|---|---|
| 02-01-030d-BASE-LEFT | 3D print | |
| 02-01-031d-BASE-RIGHT | 3D print | |
| 02-01-032d-ARM-LEFT | 3D print | arm, Spooler Smart |
| 02-01-033d-ARM-RIGHT | 3D print | arm, Spooler Smart |
| 02-01-035d-BASE-FRONT | 3D print | |
| 02-01-040-Milwaukee_Packout | 3D print | Packout holder |
| 02-01-041-RYGL-L | 3D print | |
| 02-01-046d-BATERY-LID | 3D print | battery lid |
| 02-01-061-CLIP_BASE-M4-assy | 3D print | latch base |
Encoder head
| Part | Made by | Note |
|---|---|---|
| 02-01-007-SPRING HOUSING-M6 | 3D print | |
| 02-01-010-ENCODER-SPACER | 3D print | |
| 02-01-011d-ENCODER-BASE | 3D print | |
| 02-01-012a-ENCODER-VALEC-A | 3D print | |
| 02-01-013-MAGNET-HOLDER | 3D print | |
| 02-01-015-PUSHER-CLAMP | 3D print | |
| 02-01-016a-PUSHER | 3D print | |
| 02-01-018-PUSH-CYLINDER | 3D print | |
| 02-01-105-BOARD_HOLDER | 3D print |
Rollers
| Part | Made by | Note |
|---|---|---|
| 02-01-020a-ROLL | lathe | nylon, or printed |
| 02-01-021-AXIS M8x15 | lathe | axis, aluminium |
Threaded inserts
Most joints use plastic threaded inserts (M3, M4, M5, M6). Press them in before you screw the parts together, always into the part named in the drawing next to the insert. The numbers are given with each assembly below. The inserts are heat-set with a soldering iron with a flat tip: place the insert on the hole, press it slowly into the part with the heated tip until it is flush, and let it cool before you load the part.
Next you build the head, the rollers, the body and wire the electronics.
Step 1Encoder head
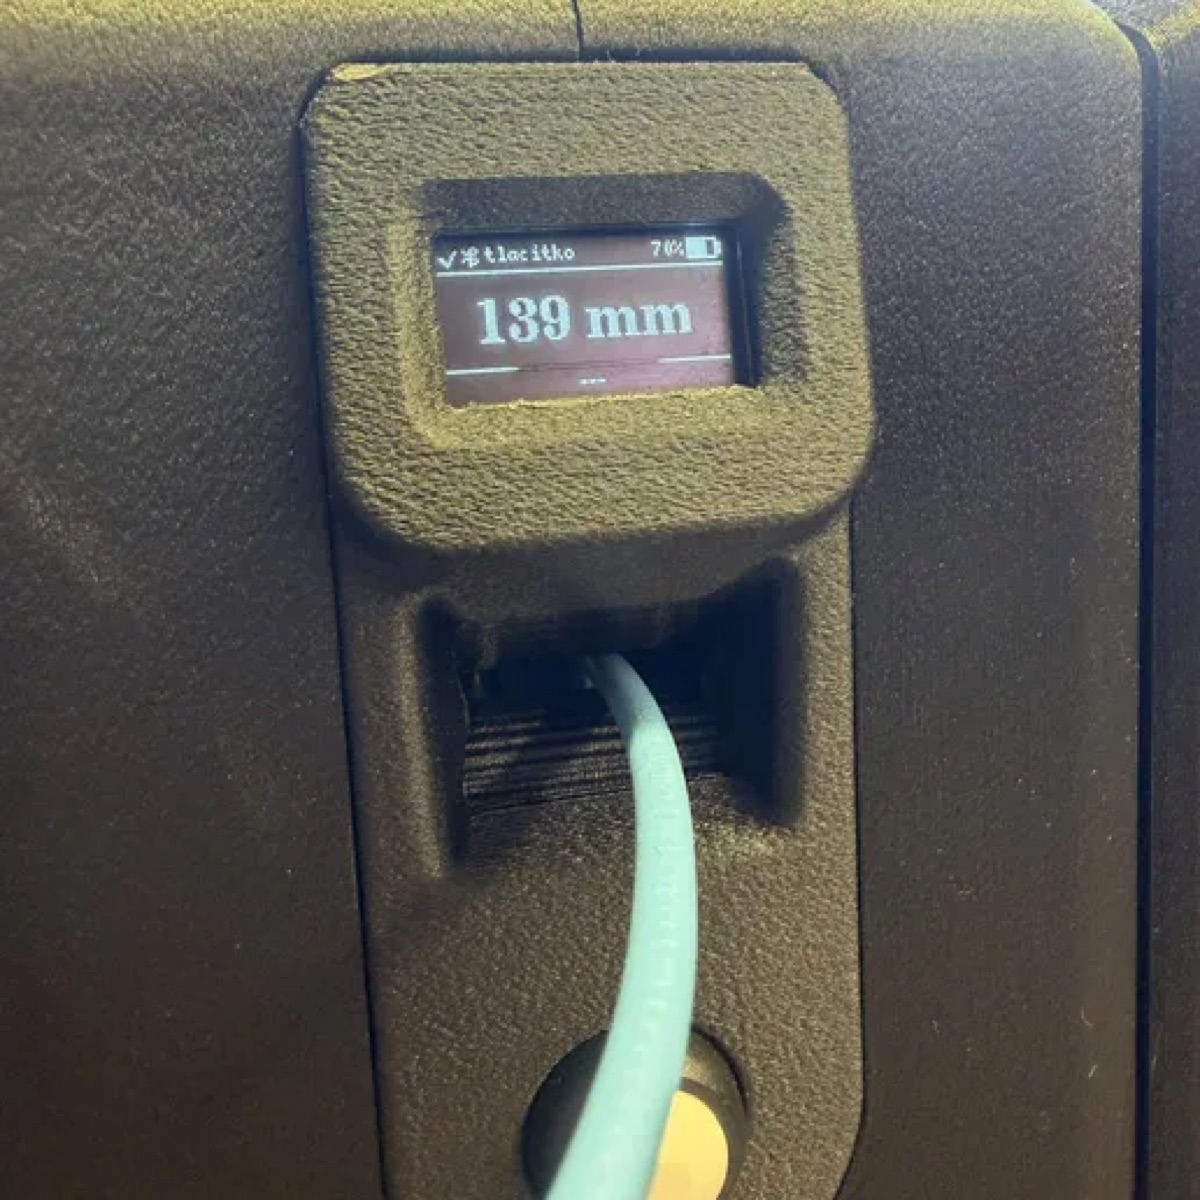
The head measures the length of the cable. The cable passes between a knurled wheel with a magnet and a pressure roller. The AS5600 sensor reads the rotation of the magnet.
1. Base, display, sensor and button
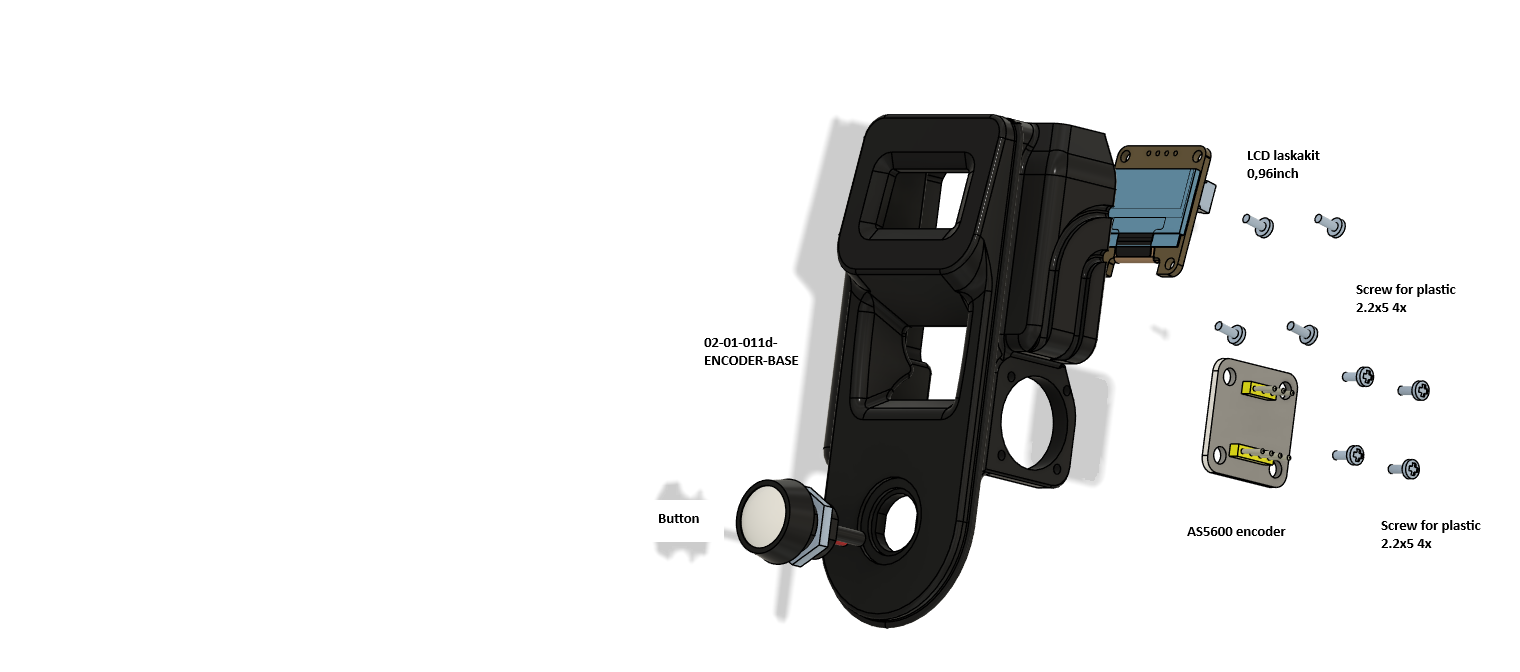
| Qty | Part | Note |
|---|---|---|
| 1 | 02-01-011d-ENCODER-BASE | |
| 1 | Display 0.96", Laskakit | OLED, 4-pin connector |
| 1 | AS5600 board (sensor) | 5-pin connector on the board |
| 1 | Button | Into the bottom hole, nut from behind |
| 8 | Plastic screw 2.2x5 | 4 for the display, 4 for the AS5600 |
- Screw the display on with four 2.2x5 screws.
- Screw the AS5600 board on with four 2.2x5 screws so that it lies above the axis of the wheel with the magnet.
- Put the button into the bottom hole and tighten the nut.
2. The pressure clamp
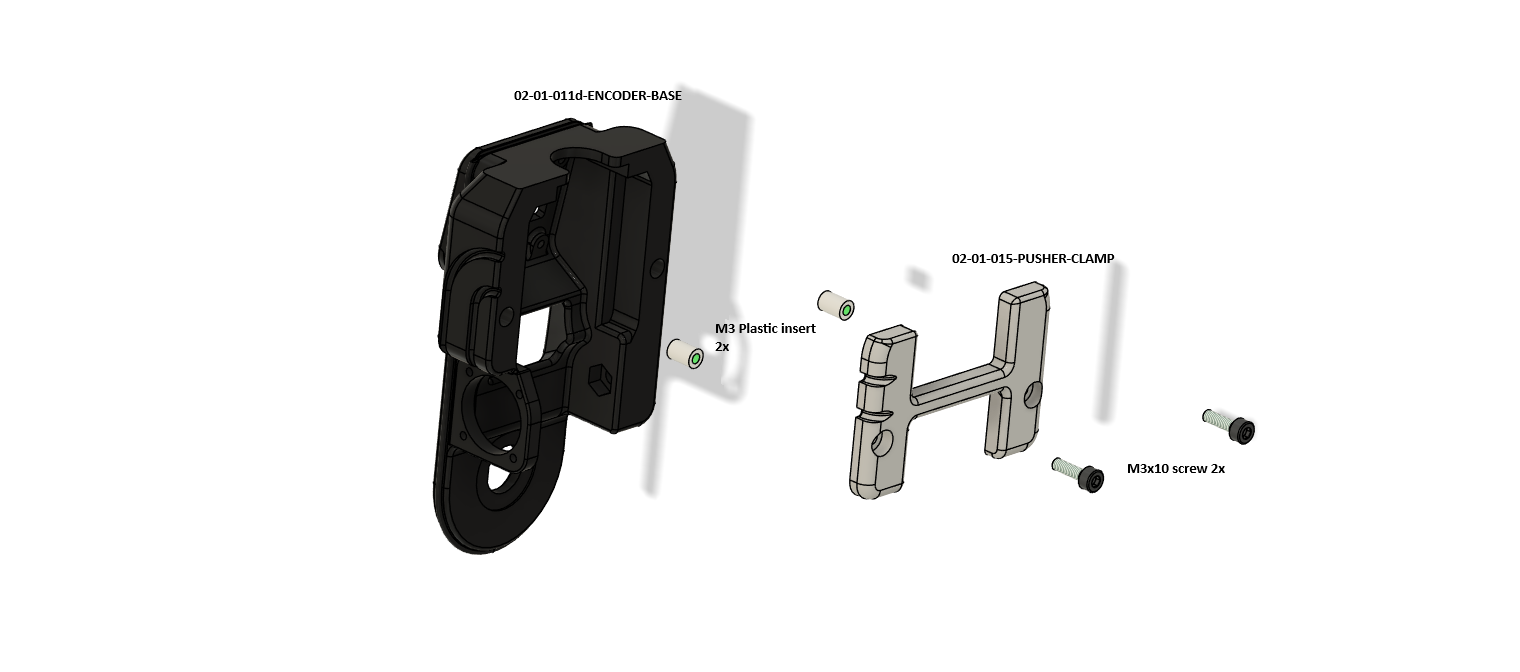
- Press two M3 inserts into the base.
- Screw 02-01-015-PUSHER-CLAMP on with two M3x10 screws. Do not tighten the clamp fully yet, the pusher goes in under it.
3. The pusher
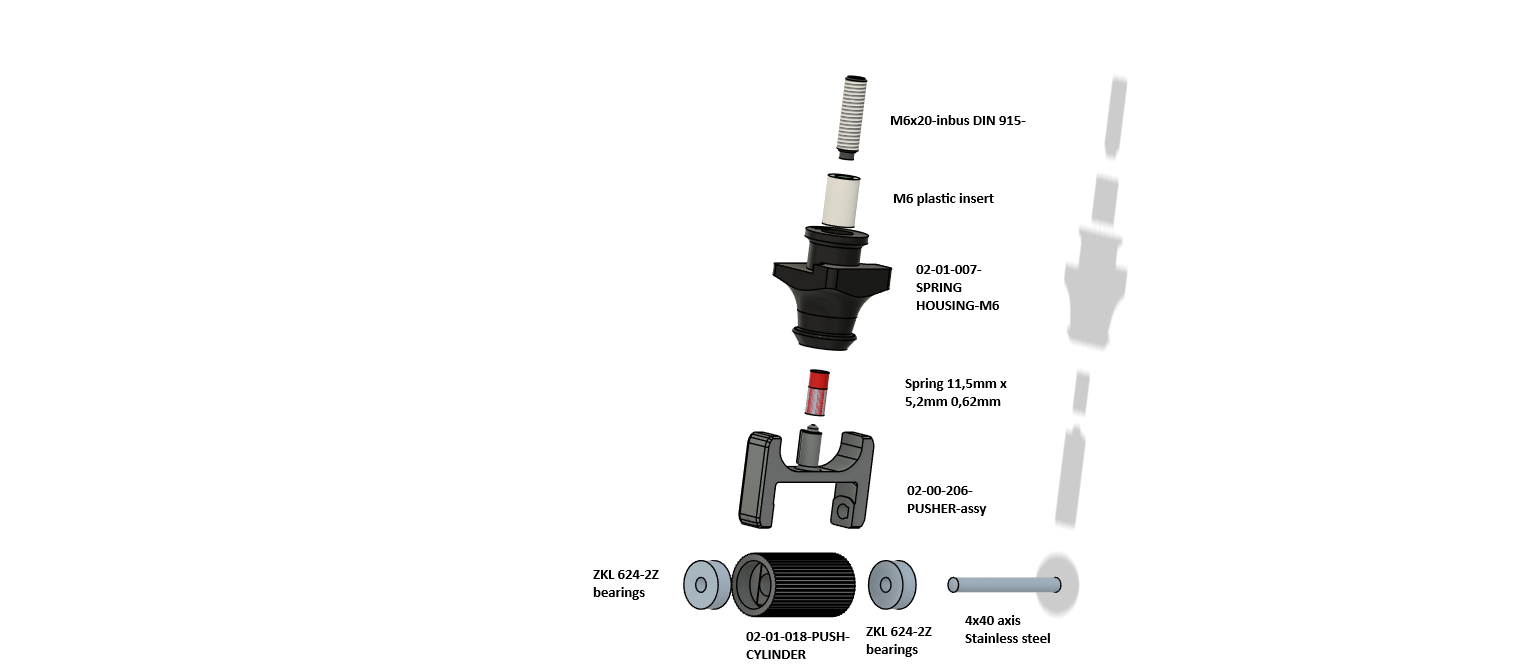
| Qty | Part | Note |
|---|---|---|
| 1 | 02-00-206-PUSHER-assy (02-01-016a-PUSHER) | Fork |
| 1 | 02-01-018-PUSH-CYLINDER | Pressure roller |
| 2 | Bearing ZKL 624-2Z | |
| 1 | Axis 4x40, stainless | |
| 1 | 02-01-007-SPRING HOUSING-M6 | Spring housing |
| 1 | Spring 11.5 x 5.2 mm, wire 0.62 mm | |
| 1 | M6 insert + screw M6x20 (DIN 915 in the drawing) | Adjusts the pressure |
- Put both 624-2Z bearings into PUSH-CYLINDER and push the 4x40 axis through the fork of the pusher.
- Put the spring on the pin of the pusher.
- Press the M6 insert into SPRING HOUSING and screw in the M6x20. The screw sets the force of the pressure.
- Put the whole assembly under PUSHER-CLAMP and tighten the clamp.
4. The encoder wheel with the magnet
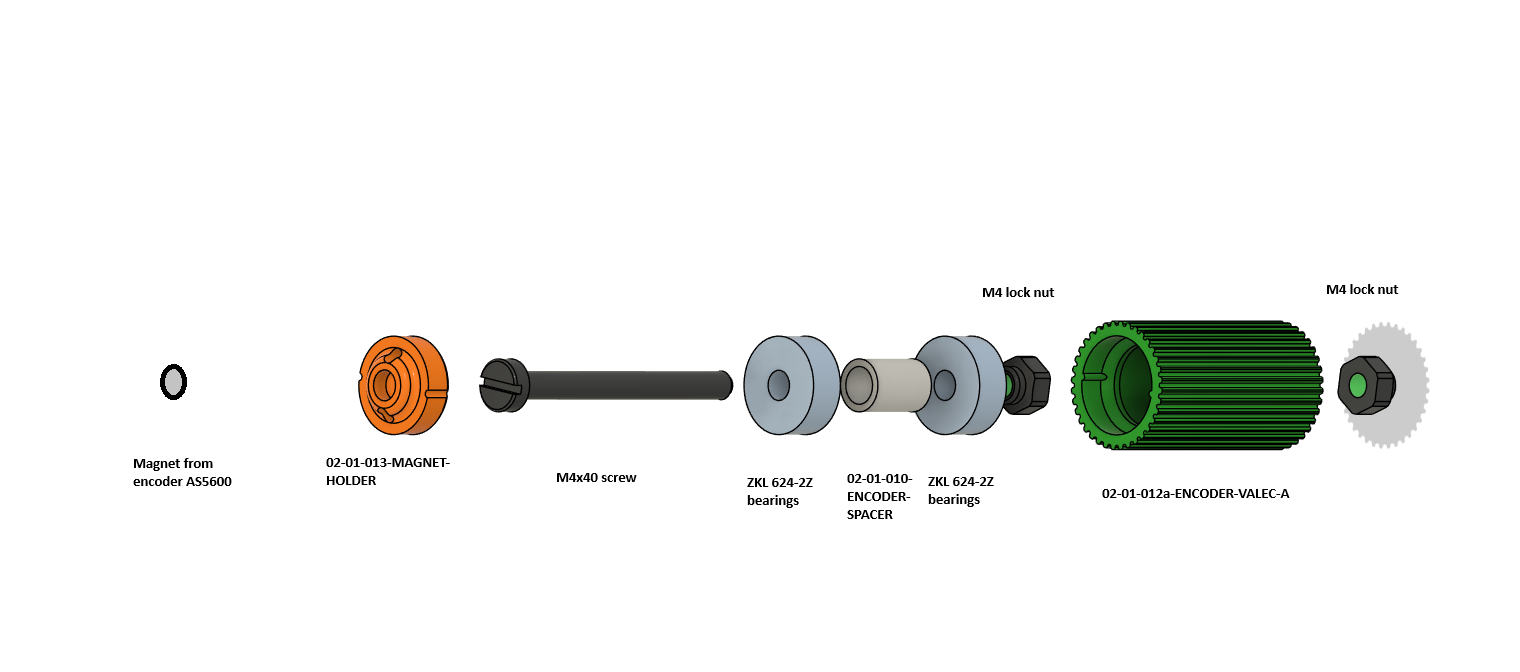
| Qty | Part | Note |
|---|---|---|
| 1 | 02-01-012a-ENCODER-VALEC-A | Knurled wheel (green) |
| 1 | 02-01-010-ENCODER-SPACER | Spacer tube between the bearings |
| 2 | Bearing ZKL 624-2Z | |
| 1 | 02-01-013-MAGNET-HOLDER | Magnet holder (orange) |
| 1 | Magnet from the AS5600 | Ring magnet, supplied with the board |
| 1 | Screw M4x40 | |
| 2 | Nut M4, self-locking |
- Put the magnet into MAGNET-HOLDER.
- Put a bearing, the SPACER and the second bearing into the wheel.
- Push the M4x40 through and secure it with the self-locking M4 nuts. The wheel must turn without play.
- Put the assembly into the base so that the magnet faces the AS5600 board.
Step 2Rollers
The rollers carry the spool: the spool sides sit in them and the spool turns on them. They are the same in both versions of the device. There are eight in every device. One assembly is made of an aluminium axis, two 608 bearings and two rollers, so the device needs four assemblies, that is four axes. The axis is turned, 71 mm long, with an M8 thread 15 mm long at both ends.
What you will need
| Qty | Part | Note |
|---|---|---|
| 2 (8 in all) | 02-01-020a-ROLL | Roller. Turned from nylon, printed, or from the e-shop |
| 1 (4 in all) | 02-01-021-AXIS M8x15 | Aluminium, 71 mm, M8 x 15 thread at both ends |
| 2 (8 in all) | Bearing ZKL 608-2RS | |
| 2 (8 in all) | Washer 8x12 | As in the drawing, on each side |
| 2 (8 in all) | Washer 8x16 | |
| 2 (8 in all) | Screw M8x20 |

Assembly
1. Fit the washers and bearings
On each end of the axis put a washer 8x12 and a washer 8x16, then a bearing 608-2RS.
2. Fit the rollers
Put a roller ROLL on each bearing. The roller must turn freely on the bearing.
3. Secure with the screws
Secure the assembly from both sides with an M8x20 screw into the thread at the end of the axis.
Putting it into the body
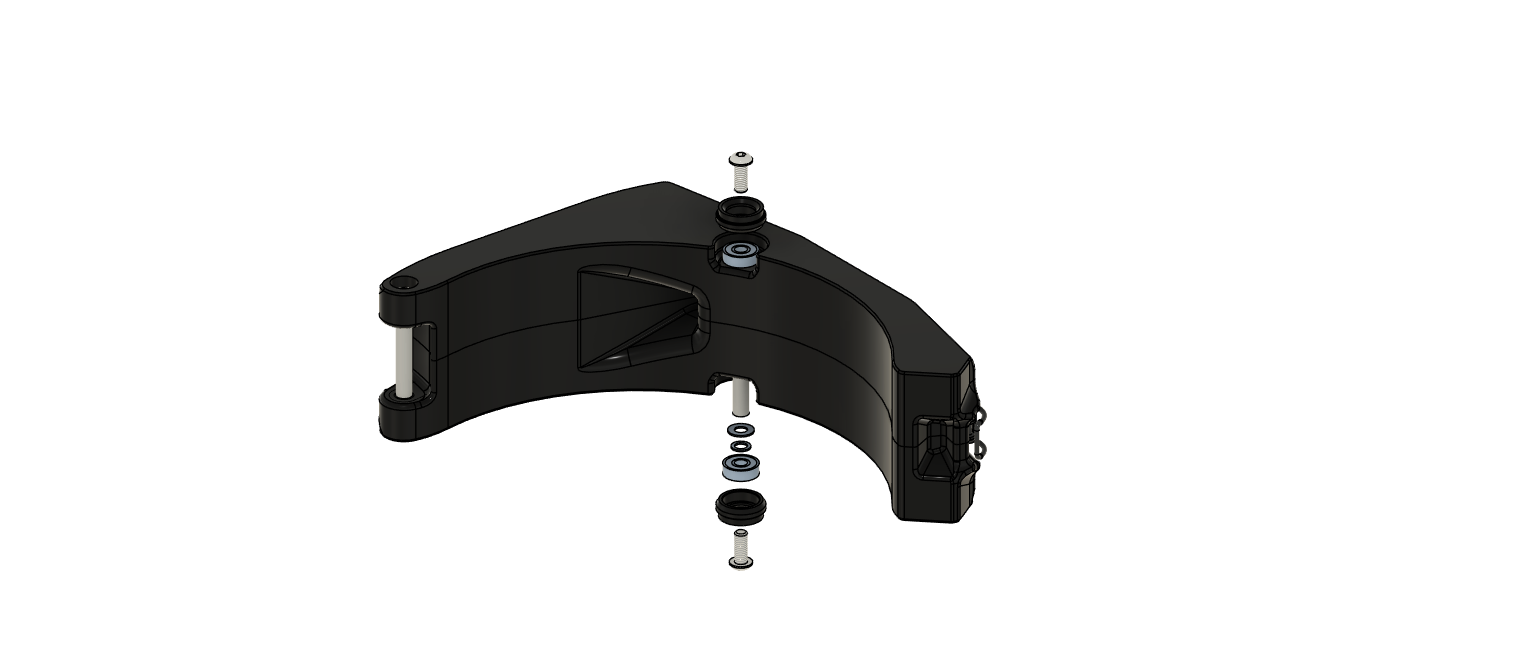
4. Put the assembly into the arm
Put the finished assembly into the arm as in the picture. Check that both rollers turn freely.
Step 3Body
The body is made of two halves of the arms with a base, a front part and holders. The procedure has five steps.
1. The battery holder
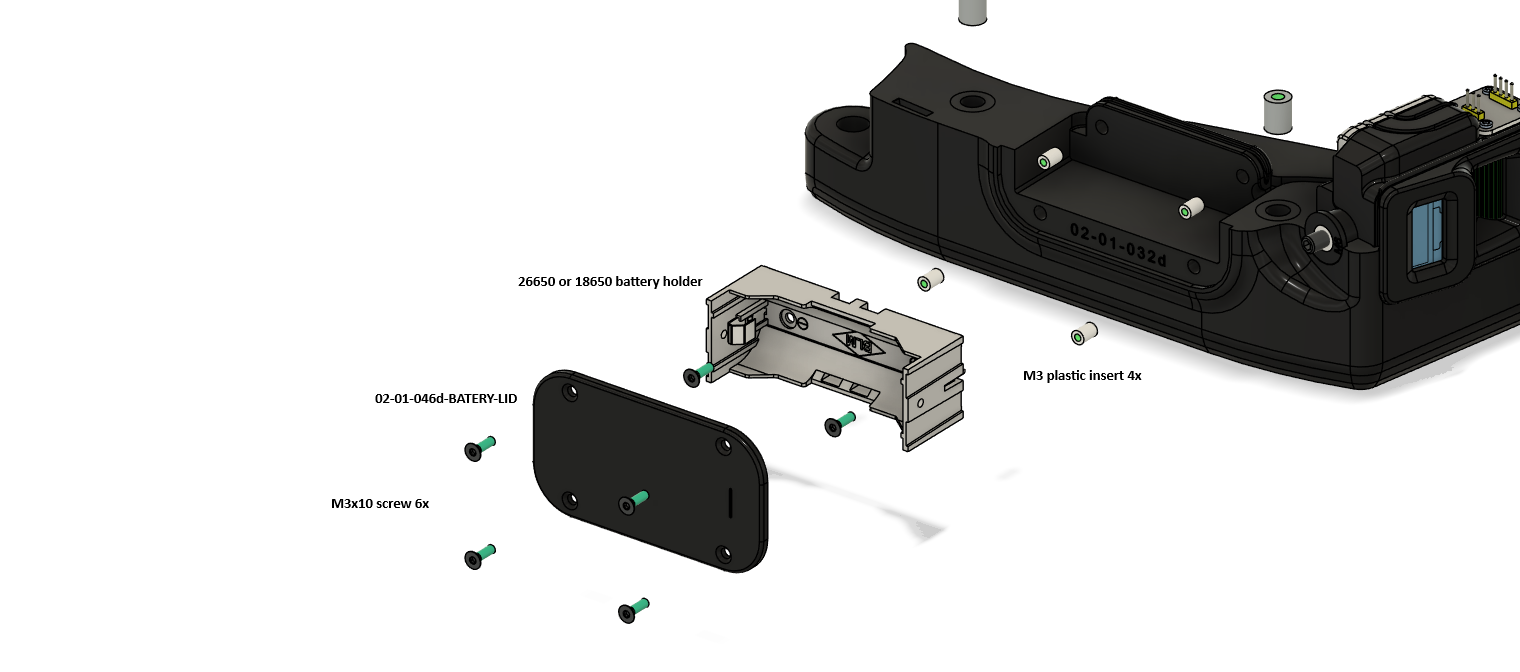
| Qty | Part | Note |
|---|---|---|
| 1 | Battery holder 26650 or 18650 | |
| 1 | 02-01-046d-BATERY-LID | Lid |
| 4 | M3 insert | |
| 6 | M3x10 screw | As in the drawing |
- Press the M3 inserts into the arm.
- Screw the battery holder on.
- Glue or secure the battery cables (see the chapter Electronics) and put the lid on.
2. The latch
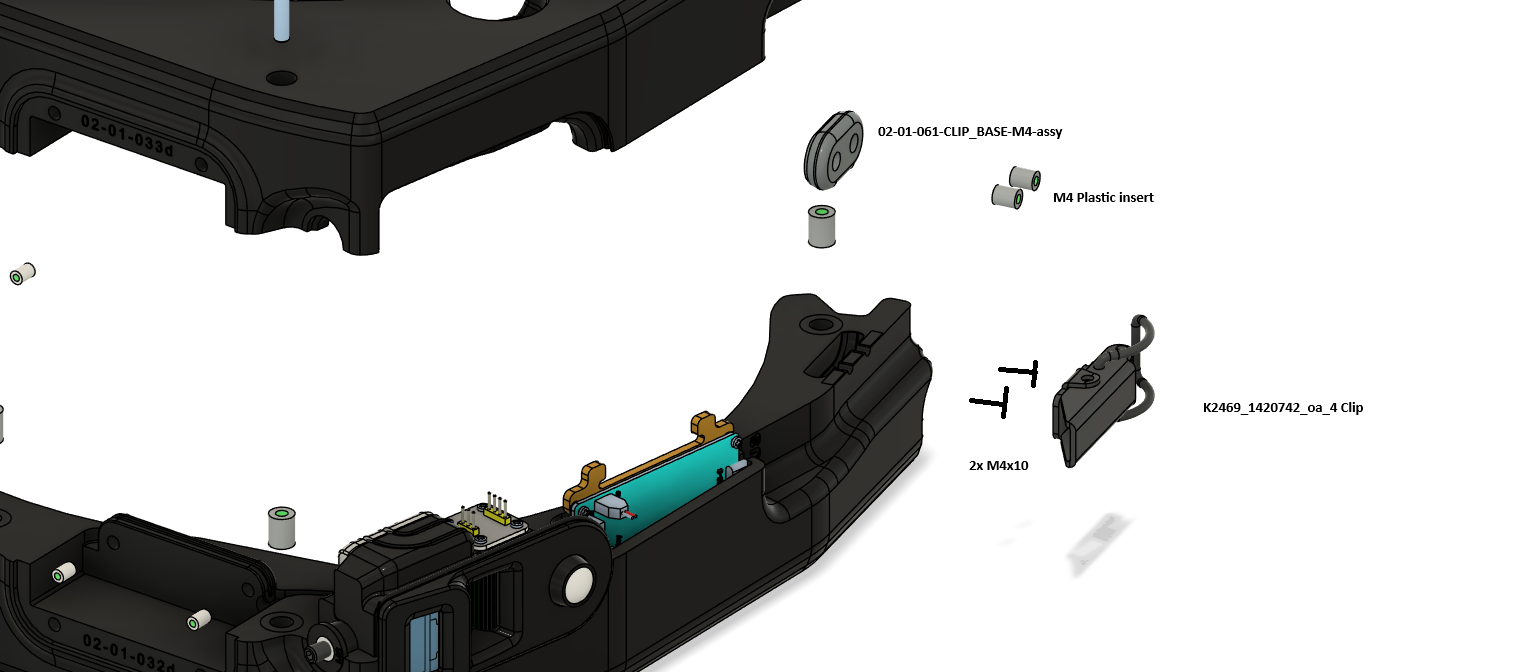
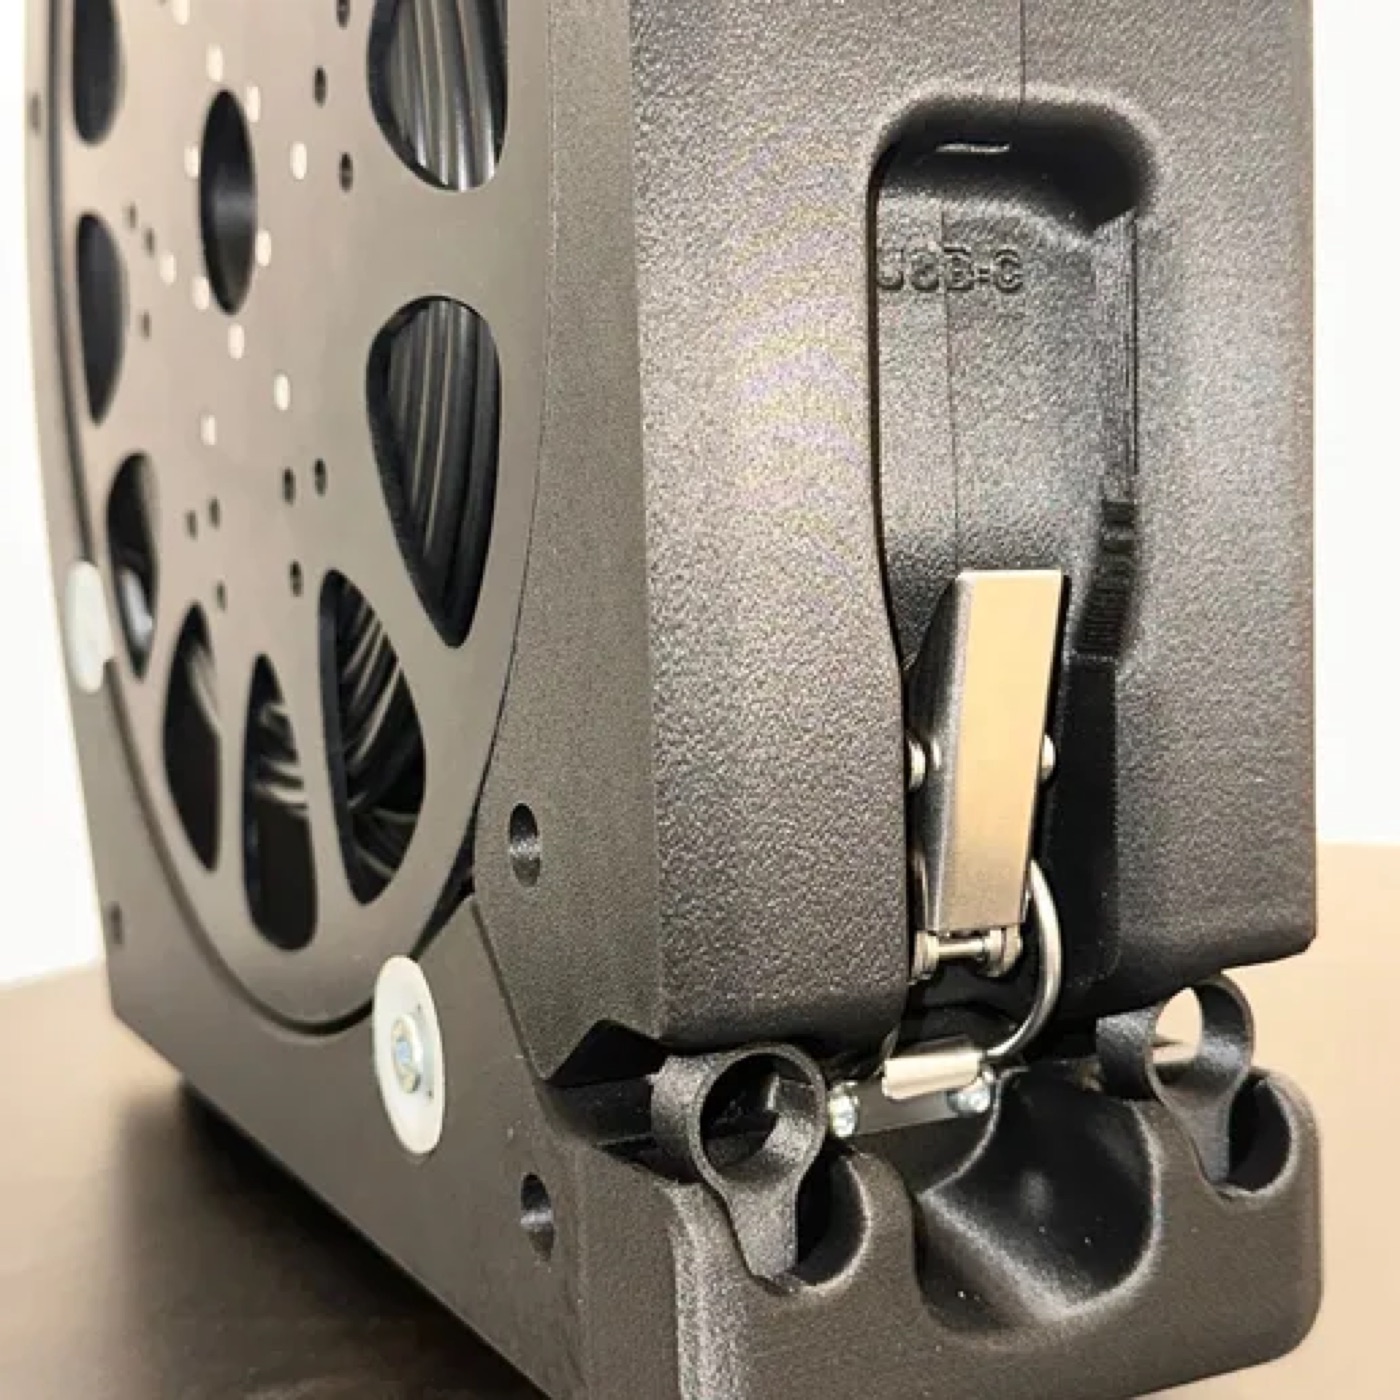
- Press in two M4 inserts.
- Put 02-01-061-CLIP_BASE-M4-assy and the latch K2469 in place and screw them on with two M4x10 screws.
3. The arms with the board
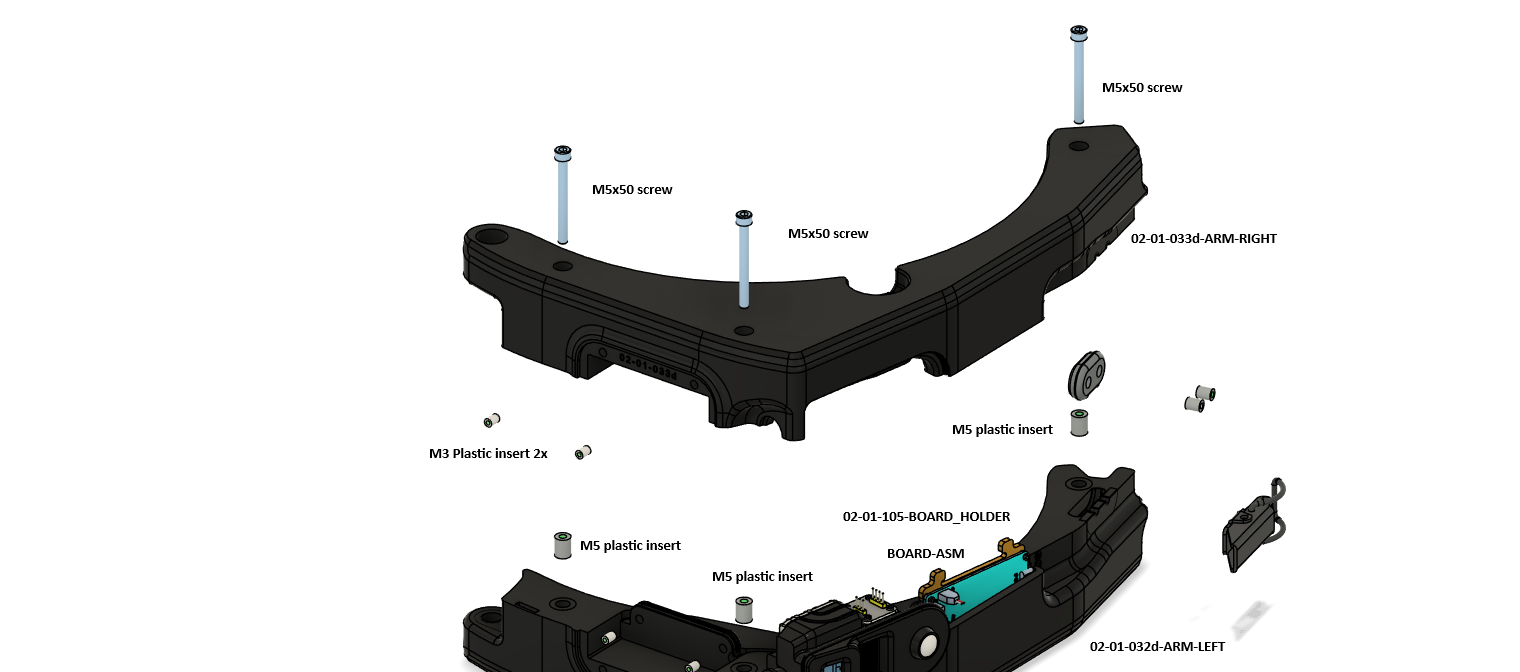
| Qty | Part | Note |
|---|---|---|
| 1 | 02-01-032d-ARM-LEFT | |
| 1 | 02-01-033d-ARM-RIGHT | |
| 1 | 02-01-105-BOARD_HOLDER with the board (BOARD-ASM) | See the chapter Electronics |
| 3 | Screw M5x50 | |
| 2 | M3 insert | |
| 2 | M5 insert | As in the drawing |
- Press in the M5 and M3 inserts.
- Put the board in its holder into ARM-LEFT and connect it before you join the arms.
- Put ARM-RIGHT on and pull the arms together with three M5x50 screws.
4. The front part
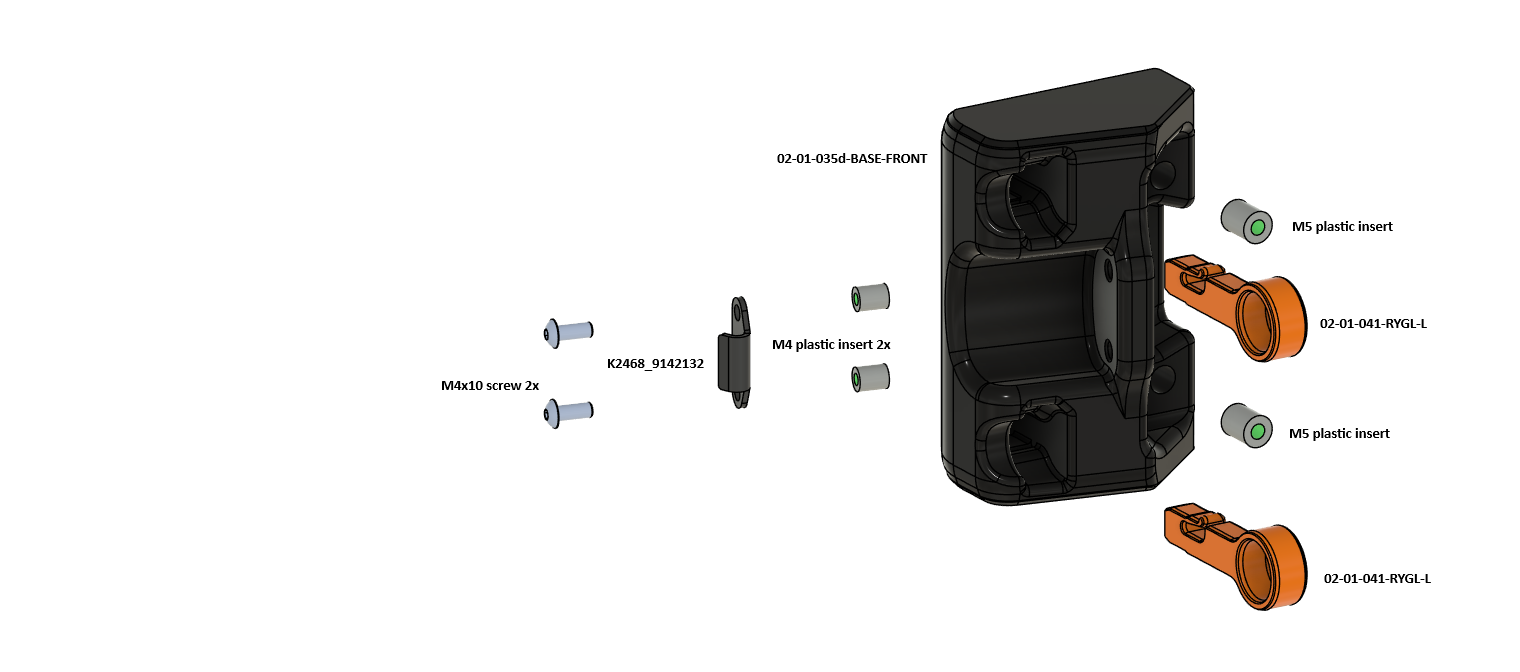
| Qty | Part | Note |
|---|---|---|
| 1 | 02-01-035d-BASE-FRONT | |
| 2 | 02-01-041-RYGL-L | Orange |
| 2 | M5 insert | For RYGL-L |
| 2 | M4 insert | For the catch |
| 1 | K2468_9142132 (catch) | See Buying |
| 2 | M4x10 screw |
5. The bases and the Packout holders
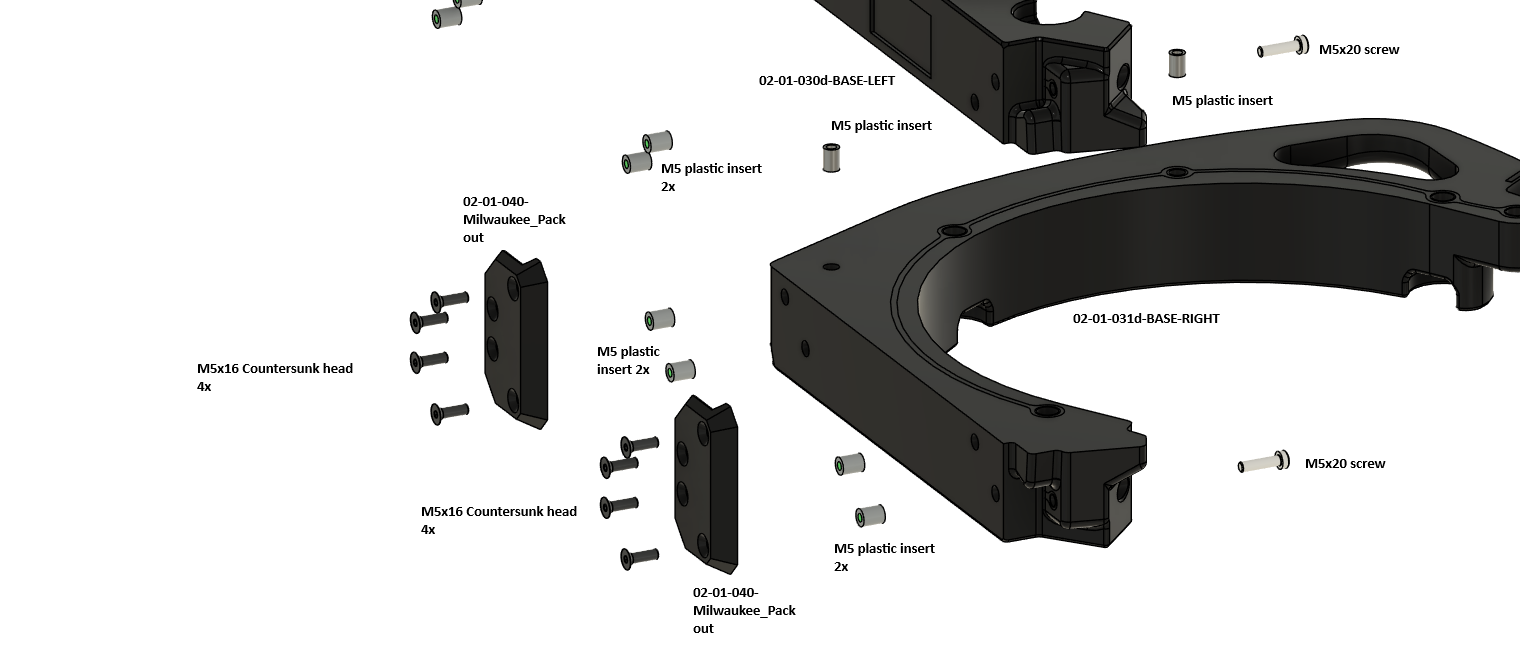
| Qty | Part | Note |
|---|---|---|
| 1+1 | 02-01-030d-BASE-LEFT, 02-01-031d-BASE-RIGHT | |
| 2 | 02-01-040-Milwaukee_Packout | Each to its base |
| 8 | M5x16 countersunk screw | 4 for each holder |
| 2 | Screw M5x20 | Joining the bases |
- Press the M5 inserts into the bases.
- Screw each Packout on with four M5x16 countersunk screws.
- Join the bases with the M5x20 screws.
Step 4Electronics
The control board carries the ESP32, the buzzer and the USB-C. Four connectors are plugged into the board.
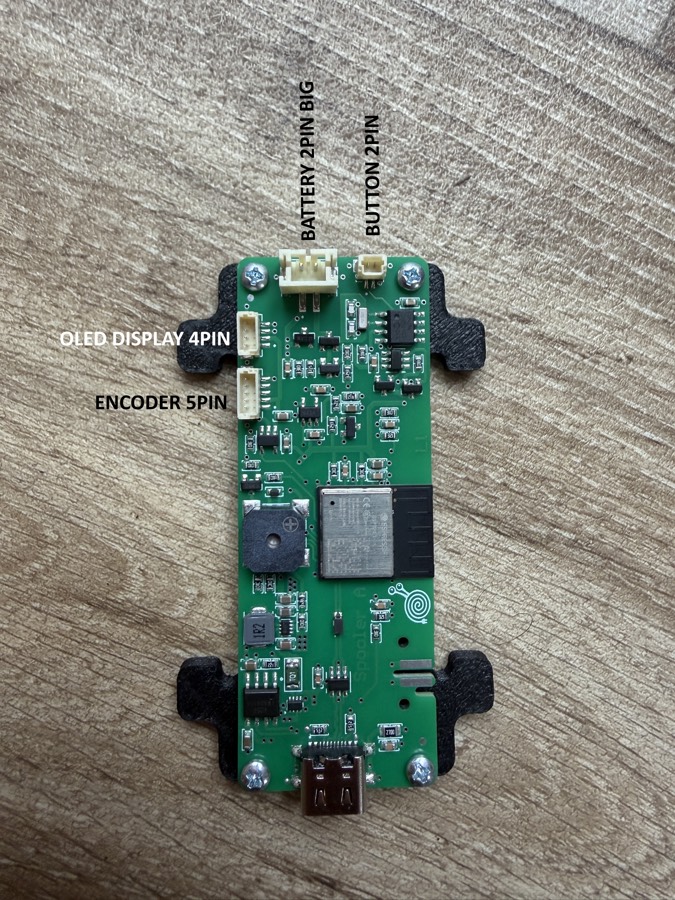
| Connector | Pins | Connects to |
|---|---|---|
| BATTERY | 2, large | Battery holder 18650 / 26650 |
| BUTTON | 2 | The button in the encoder head |
| OLED DISPLAY | 4 | Display 0.96" |
| ENCODER | 5 | The AS5600 board |
Cable routing in the photos
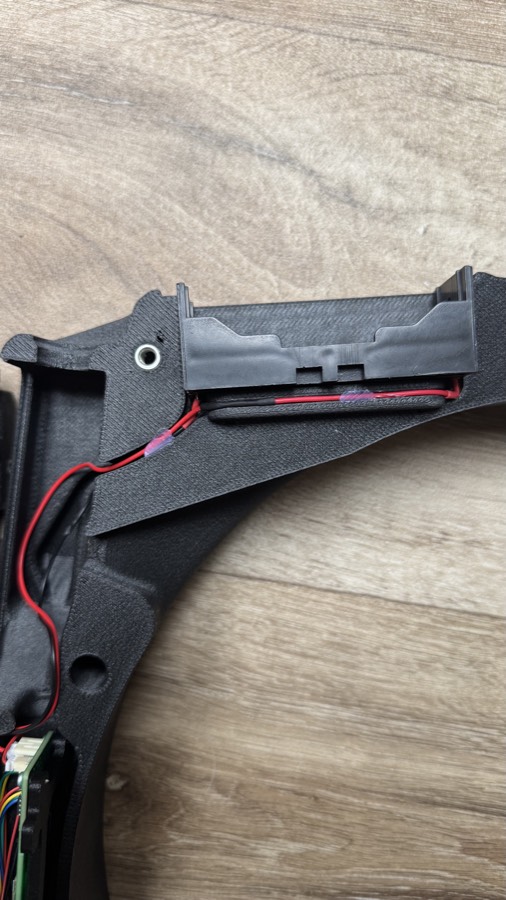
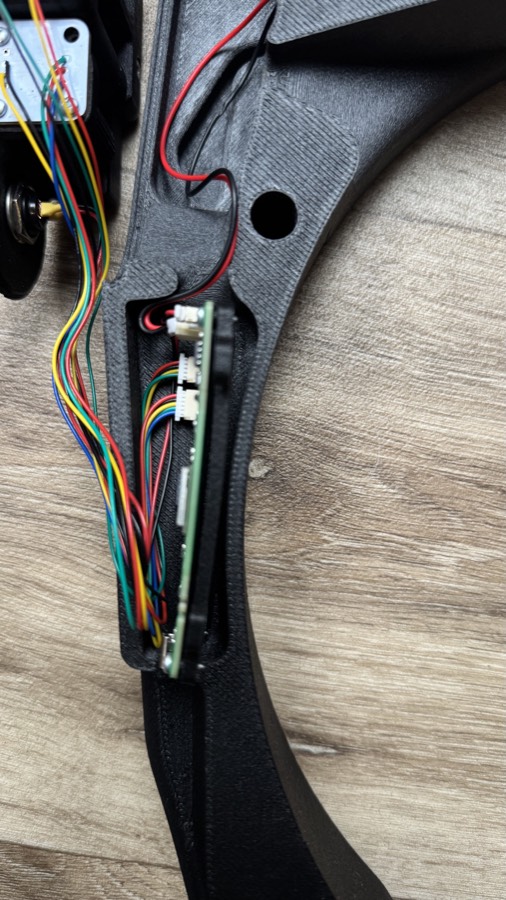
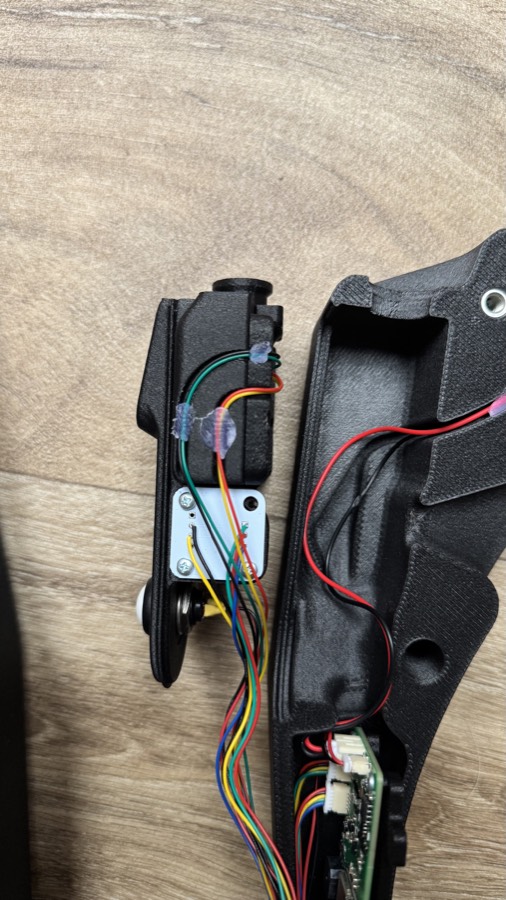
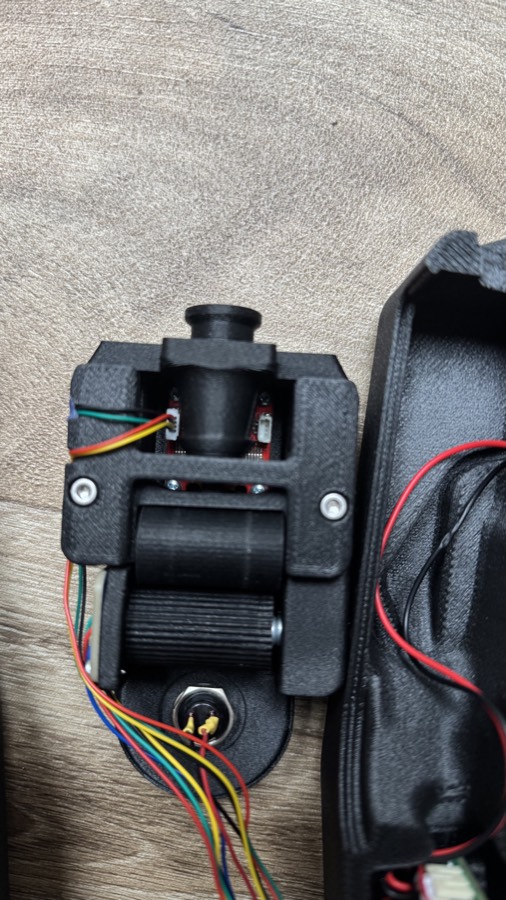
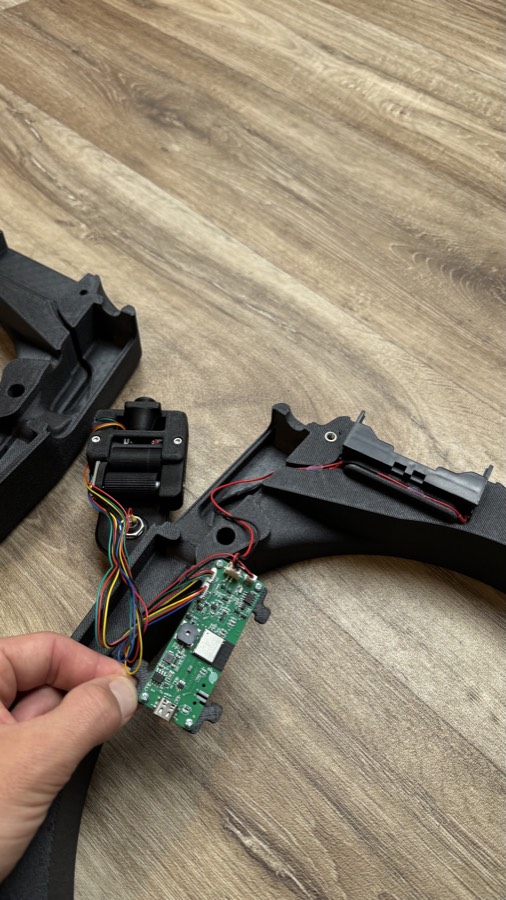
- Connect the battery and put it into the holder. Lay the cables in the channel and fix them (in the photos with small drops of glue or tape).
- Connect the display, the AS5600 and the button to the connectors of the board as described above.
- Lead the bundle of cables from the encoder head to the arm with the board and leave some slack for opening.
- Before you close the arms check that no cable is pinched in the joint.
BuyingWhat to buy and where
You can buy the ready-made electronics (the assembled control board, the display and the AS5600 sensor) and the turned and laser-cut parts in our e-shop. The rollers and the spool sides are there too. What is left are ordinary fasteners and these components:
| Part | Note |
|---|---|
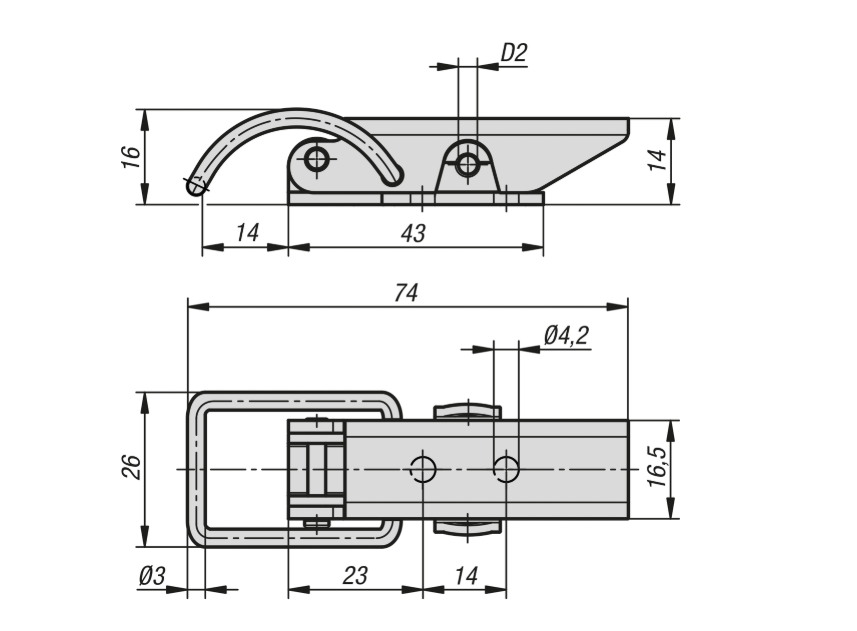
| Draw latch K2469 | Steel/stainless steel, round bail, up to 900 N, concealed holes. Hole spacing 14 mm, holes Ø 4.2 mm. Kipp |
| Catch K2468 (9142132) | The catch for the latch. Kipp |
| Bearing 624-2Z (4x13x5) | For example SKF 624-2Z, 624ZZ is fine too |
| Bearing 608-2RS (8x22x7) | For example RS PRO 608-2RS, a skateboard bearing works too |
| Battery holder 18650/26650, 16 mm panel button | Ordinary electronics suppliers |
| Springs (2 types), stainless axis 4x40 | The dimensions are in the bill of materials |
| Threaded inserts M3 to M6 | For example McMaster-Carr or CNC Kitchen inserts at 3DJake. The length of the insert must match the depth of the hole (CNC Kitchen standard: M3 5.7 mm, M4 8.1 mm, M5 9.5 mm, M6 12.7 mm) |
| Screws M3, M4, M5, M6, M8, M4 lock nuts, washers 8x12 and 8x16 | The numbers are with the steps and in the bill of materials |